EmbedScript 2019

Based on my decision to stick with browser-based sandboxing instead of pushing on with ScriptinScript, I’ve started writing up notes reviving my old idea for an EmbedScript extension for MediaWiki. It’ll use the <iframe> sandbox and Content-Security-Policy to run widgets in article content (with a visible/interactive HTML area) and plugins (headless) for use in UI extensions backed by trusted host APIs which let the plugin perform limited actions with the user’s permission.

There are many details yet to be worked out, and I’ll keep updating that page for a while before I get to coding. In particular I want to confirm things like the proper CSP headers to prevent cross-origin network access (pretty sure I got it, but must test) and how to perform the equivalent sandboxing in a web view on mobile platforms! Ensuring that the sandbox is secure in a browser before loading code is important as well — older browsers may not support all the sandboxing needed.

I expect to iterate further on the widgets/plugins/host APIs model, probably to include a concept of composable libraries and access to data resources (images, fonts, audio/video files, even data from the wiki, etc).

The widget, plugin, and host API definitions will need to be stored and editable on-wiki — like a jsfiddle.net “fiddle” editing can present them as 4-up windows of HTML, CSS, JS, and output — but with additional metadata for dependencies and localizable strings. I hope to use MediaWiki’s new “multi-content revisions” system to store the multiple components as separate content pieces of a single wiki page, versioned together.

Making sure that content widgets can be fairly easy ported to/from non-MediaWiki platforms would be really wise though. A git repo adapter? A single-file .html exporter? Embedding the content as offsite-embeddable iframes as well, without the host page having API or data access? Many possibilities. Is there prior art in this area?

Also need to work out the best way to instantiate objects in pages from the markup end. I’d like for widgets in article pages to act like media files in that you can create them with the [[File:blah]] syntax, size them, add borders and captions, etc. But it needs to integrate well with the multimedia viewer zoom view, etc (something I still need to fix for video too!)… and exposing them as a file upload seems weird. And what about pushing one-off data parameters in? Desirable or extra complication?

Anyway, check the on-wiki notes and feel free to poke me with questions, concerns, and ideas y’all!

Defender of the Realm

I showed some iterations of ScriptinScript’s proposed object value representation, using native JS objects with a custom prototype chain to isolate the guest world’s JS objects. The more I looked I saw more corner cases… I thought of the long list of security issues with the old Caja transpiling embedding system, and decided it would be best to change course.

Not only are there a lot of things to get right to avoid leaking host objects, it’s simply a lot of work to create a mostly spec-compliant JavaScript implementation, and then to maintain it. Instead I plan to let the host JavaScript implementation run almost the entire show, using realms.

What’s a Realm?

Astute readers may have clicked on that link and noticed that the ECMAScript committee’s realms proposal is still experimental, with no real implementations yet… But realms are actually a part of JS already, there’s just no standard way to manipulate them! Every function is associated with a realm that it runs in, which holds the global object and the intrinsic objects we take for granted — say, Object. Each realm has its own instance of each of these instrinsics, so if an object from one realm does make its way to another realm, their prototype chains will compare differently.

That sounds like what we were manually setting up last time, right? The difference is that when native host operations like throwing exceptions in a built-in function, auto-boxing a primitive value to an object, etc happen, the created Error or String etc instance will have the realm-specific prototype without us having to guard for it and switch it around.

If we have a separate realm for the guest environment, then there are a lot fewer places we have to guard against getting host objects.

Getting a realm

There are a few possible ways we can manage to get ahold of a separate realm for our guest code:

  • Un-sandboxed <iframe>
  • Sandboxed <iframe>
  • Web Worker thread
  • ‘vm’ module for Node.js

It should be possible to combine some of these techniques, such as using the future-native Realm inside a Worker inside a sandboxed iframe, which can be further locked down with Content-Security-Policy headers!

Note that using sandboxed or cross-origin <iframe>s or Workers requires asynchronous messaging between host and guest, but is much safer than Realm or same-origin <iframe> because they prevent all object leakage.

Similar techniques are used in existing projects like Oasis to seeming good effect.

Keep it secret! Keep it safe!

To keep the internal API for the guest environment clean and prevent surprise leakages to the host realm, it’s probably wise to clean up the global object namespace and the contents of the accessible intrinsics.

This is less important if cross-origin isolation and Content-Security-Policy are locked down carefully, but probably still a good idea.

For instance you probably want to hide some things from guest code:

  • the global message-passing handlers for postMessage to implement host APIs
  • fetch and XMLHttpRequest for network access
  • indexedDB for local-origin info
  • etc

In an <iframe> you would probably want to hide the entire DOM to create a fresh realm… But if it’s same-origin I don’t quite feel confident that intrinsics/globals can be safely cleaned up enough to avoid escapes. I strongly, strongly recommend using cross-origin or sandboxed <iframe> only! And a Worker that’s loaded from an <iframe> might be best.

In principle the realm can be “de-fanged” by walking through the global object graph and removing any property not on an allow list. Often you can also replace a constructor or method with an alternate implementation… as long as its intrinsic version won’t come creeping back somewhere. Engine code may throw exceptions of certain types, for instance, so they may need pruning in their details as well as pruning from the global tree itself.

In order to provide host APIs over postMessage, keep local copies of the global’s postMessage and addEventListener in a closure and set them up before cleaning the globals. Be careful in the messaging API to use only local variable references, no globals, to avoid guest code interfering with the messaging code.

Whither transpiling?

At this point, with the host environment in a separate realm *and* probably a separate thread *and* with its globals and intrinsics squeeky clean… do we need to do any transpiling still?

It’s actually, I think, safe at that point to just pass JS code for strict mode or non-strict-mode functions in and execute it after the messaging kernel is set up. You should even be able to create runtime code with eval and the Function constructor without leaking anything to/from the host context!

Do we still even need to parse/transpile? Yes!

But the reason isn’t for safety, it’s more for API clarity, bundling, and module support… Currently there’s no way to load JS module code (with native import/export syntax) in a Worker, and there’s no way to override module URL-to-code resolution in <script type=”module”> in an <iframe>.

So to support modern JS modules for guest code, you’d need some kind of bundling… which is probably desired anyway for fetching common libraries and such… and which may be needed to combine the messaging kernel / globals cleanup bootstrap code with the guest code anyway.

There’s plenty of prior art on JS module -> bundle conversion, so this can either make use of existing tools or be inspired by it.

Debugging

If code is simply executed in the host engine, this means two things:

One, it’s hard to debug from within the web page because there aren’t tools for stopping the other thread and introspecting it.

Two, it’s easy to debug from within the web browser because the host debugger Just Works.

So this is probably good for Tools For Web Develepers To Embed Stuff but may be more difficult for Beginner’s Programming Tools (like the BASIC and LOGO environments of my youth) where you want to present a slimmed-down custom interface on the debugger.

Conclusions

Given a modern-browser target that supports workers, sandboxed iframes, etc, using those native host tools to implement sandboxing looks like a much, much better return on investment than continuing to implement a full-on interpreter or transpiler for in-process code.

This in some ways is a return to older plans I had, but the picture’s made a LOT clearer by not worrying about old browsers or in-process execution. Setting a minimal level of ES2017 support is something I’d like to do to expose a module-oriented system for libraries and APIs, async, etc but this isn’t strictly required.

I’m going to re-work ScriptinScript in four directions:

First, the embedding system using <iframe>s and workers for web or ‘vm’ for Node, with a messaging kernel and global rewriter.

Second, a module bundling frontend that produces ready-to-load-in-worker JS, that can be used client-side for interactive editing or server-side for pre-rendering. I would like to get the semantics of native JS modules right, but may approximate them as a simplification measure.

Third, a “Turtle World” demo implementing a much smaller interpreter for a LOGO-like language, connected to a host API implementing turtle graphics in SVG or <canvas>. This will scratch my itch to write an interpreter, but be a lot simpler to create and maintain. ;)

Finally, a MediaWiki extension that allows storing the host API and guest code for Turtle World in a custom wiki namespace and embedding them as media in articles.

I think this is a much more tractable plan, and can be tackled bit by bit.

ScriptinScript value representation

As part of my long-running side quest to make a safe, usable environment for user-contributed scripted widgets for Wikipedia and other web sites, I’ve started working on ScriptinScript, a modern JavaScript interpreter written in modern JavaScript.

It’ll be a while before I have it fully working, as I’m moving from a seat-of-the-pants proof of concept into something actually based on the language spec… After poking a lot at the spec details of how primitives and objects work, I’m pretty sure I have a good idea of how to represent guest JavaScript values using host JavaScript values in a safe, spec-compliant way.

Primitives

JavaScript primitive types — numbers, strings, symbols, null, and undefined — are suitable to represent themselves; pretty handy! They’re copyable and don’t expose any host environment details.

Note that when you do things like reading str.length or calling str.charCodeAt(index) per spec it’s actually boxing the primitive value into a String object and then calling a method on that! The primitive string value itself has no properties or methods.

Objects

Objects, though. Ah now that’s tricky. A JavaScript object is roughly a hash map of properties indexed with string or symbol primitives, plus some internal metadata such as a prototype chain relationship with other objects.

The prototype chain is similar, but oddly unlike, class-based inheritance typical in many other languages.

Somehow we need to implement the semantics of JavaScript objects as JavaScript objects, though the actual API visible to other script implementations could be quite different.

First draft: spec-based

My initial design modeled the spec behavior pretty literally, with prototype chains and property descriptors to be followed step by step in the interpreter.

Guest property descriptors live as properties of a this.props sub-object created with a null prototype, so things on the host Object prototype or the custom VMObject wrapper class don’t leak in.

If a property doesn’t exist on this.props when looking it up, the interpreter will follow the chain down through this.Prototype. Once a property descriptor is found, it has to be examined for the value or get/set callables, and handled manually.

// VMObject is a regular class
[VMObject] {
    // "Internal slots" and implementation details
    // as properties directly on the object
    machine: [Machine],
    Prototype: [VMObject] || null,

    // props contains only own properties
    // so prototype lookups must follow this.Prototype
    props: [nullproto] {
        // prop values are virtual property descriptors
        // like you would pass to Object.defineProperty()
        aDataProp: {
            value: [VMObject],
            writable: true,
            enumerable: true,
            configurable: true,
        },
        anAccessorProp: {
            get: [VMFunction],
            set: [VMFunction],
            enumerable: true,
            configurable: true,
        },
    },
}

Prototype chains

Handling of prototype chains in property lookups can be simplified by using native host prototype chains on the props object that holds the property descriptors.

Instead of Object.create(null) to make props, use Object.create(this.Prototype ? this.Prototype.props : null).

The object layout looks about the same as above, except that props itself has a prototype chain.

Property descriptors

We can go a step further, using native property descriptors which lets us model property accesses as direct loads and stores etc.

Object.defineProperty can be used directly on this.props to add native property descriptors including support for accessors by using closure functions to wrap calls into the interpreter.

This should make property gets and sets faster and awesomer!

Proper behavior should be retained as long as operations that can affect property descriptor handling are forwarded to props, such as calling Object.preventExtensions(this.props) when the equivalent guest operation is called on the VMObject.

Native objects

At this point, our inner props object is pretty much the “real” guest object, with all its properties and an inheritance chain.

We could instead have a single object which holds both “internal slots” and the guest properties…

let MachineRef = Symbol('MachineRef');

// VMObject is prototyped on a null-prototype object
// that does not descend from host Object, and which
// is named 'Object' as well from what guest can see.
// Null-proto objects can also be used, as long as
// they have the marker slots.
let VMObject = function Object(val) {
    return VMObject[MachineRef].ToObject(val);
};
VMObject[MachineRef] = machine;
VMObject.prototype = Object.create(null);
VMObject.prototype[MachineRef] = machine;
VMObject.prototype.constructor = VMObject;

[VMObject] || [nullproto] {
    // "Internal slots" and implementation details
    // as properties indexed by special symbols.
    // These will be excluded from enumeration and
    // the guest's view of own properties.
    [MachineRef]: [Machine],

    // prop values are stored directly on the object
    aDataProp: [VMObject],
    // use native prop descriptors, with accessors
    // as closures wrapping the interpreter.
    get anAccessorProp: [Function],
    set anAccessorProp: [Function],
}

The presence of the symbol-indexed [MachineRef] property tells host code in the engine that a given object belongs to the guest and is safe to use — this should be checked at various points in the interpreter like setting properties and making calls, to prevent dangerous scenarios like exposing the native Function constructor to create new host functions, or script injection via DOM innerHTML properties.

Functions

There’s an additional difficulty, which is function objects.

Various properties will want to be host-callable functions — things like valueOfand toString. You may also want to expose guest functions directly to host code… but if we use VMObject instances for guest function objects, then there’s no way to make them directly callable by the host.

Function re-prototyping

One possibility is to outright represent guest function objects using host function objects! They’d be closures wrapping the interpreter, and ‘just work’ from host code (though possibly careful in how they accept input).

However we’d need a function object that has a custom prototype, and there’s no way to create a function object that way… but you can change the prototype of a function that already has been instantiated.

Everyone says don’t do this, but you can. ;)

let MachineRef = Symbol('MachineRef');

// Create our own prototype chain...
let VMObjectPrototype = Object.create(null);
let VMFunctionPrototype = Object.create(VMObjectPrototype);

function guestFunc(func) {
    // ... and attach it to the given closure function!
    Reflect.setPrototypeOf(func, VMFunction.prototype);

    // Also save our internal marker property.
    func[MachineRef] = machine;
	return func;
}

// Create our constructors, which do not descend from
// the host Function but rather from VMFunction!
let VMObject = guestFunc(function Object(val) {
    let machine = VMObject[MachineRef];
    return machine.ToObject(val);
});

let VMFunction = guestFunc(function Function(src) {
    throw new Error('Function constructor not yet supported');
});

VMFunction.prototype = VMFunctionPrototype;
VMFunctionPrototype.constructor = VMFunction;

VMObject.prototype = VMObjectPrototype;
VMObjectPrototype.constructor = VMObject;

This seems to work but feels a bit … freaky.

Function proxying

An alternative is to use JavaScript’s Proxy feature to make guest function objects into a composite object that works transparently from the outside:

let MachineRef = Symbol('MachineRef');

// Helper function to create guest objects
function createObj(proto) {
    let obj = Object.create(proto);
    obj[MachineRef] = machine;
    return obj;
}

// We still create our own prototype chain...
let VMObjectPrototype = createObj(null);
let VMFunctionPrototype = createObj(VMObjectPrototype);

// Wrap our host implementation functions...
function guestFunc(func) {
    // Create a separate VMFunction instance instead of
    // modifying the original function.
    //
    // This object is not callable, but will hold the
    // custom prototype chain and non-function properties.
    let obj = createObj(VMFunctionPrototype);

    // ... now wrap the func and the obj together!
    return new Proxy(func, {
        // In order to make the proxy object callable,
        // the proxy target is the native function.
        //
        // The proxy automatically forwards function calls
        // to the target, so there's no need to include an
        // 'apply' or 'construct' handler.
        //
        // However we have to divert everything else to
        // the VMFunction guest object.
        defineProperty: function(target, key, descriptor) {
            if (target.hasOwnProperty(key)) {
                return Reflect.defineProperty(target, key, descriptor);
            }
            return Reflect.defineProperty(obj, key, descriptor);
        },
        deleteProperty: function(target, key) {
            if (target.hasOwnProperty(key)) {
                return Reflect.deleteProperty(target, key);
            }
            return Reflect.deleteProperty(obj, key);
        },
        get: function(target, key) {
            if (target.hasOwnProperty(key)) {
                return Reflect.get(target, key);
            }
            return Reflect.get(obj, key);
        },
        getOwnPropertyDescriptor: function(target, key) {
            if (target.hasOwnProperty(key)) {
                return Reflect.getOwnPropertyDescriptor(target, key);
            }
            return Reflect.getOwnPropertyDescriptor(obj, key);
        },
        getPrototypeOf: function(target) {
            return Reflect.getPrototypeOf(obj);
        },
        has: function(target, key) {
            if (target.hasOwnProperty(key)) {
                return Reflect.has(target, key);
            }
            return Reflect.has(obj, key);
        },
        isExtensible: function(target) {
            return Reflect.isExtensible(obj);
        },
        ownKeys: function(target) {
            return Reflect.ownKeys(target).concat(
                Reflect.ownKeys(obj)
            );
        },
        preventExtensions: function(target) {
            return Reflect.preventExtensions(target) &&
                Reflect.preventExtensions(obj);
        },
        set: function(target, key, val, receiver) {
            if (target.hasOwnProperty(key)) {
                return Reflect.set(target, key, val, receiver);
            }
            return Reflect.set(obj, key, val, receiver);
        },
        setPrototypeOf: function(target, proto) {
            return Reflect.setPrototypeOf(obj, proto);
        },
    });
}

// Create our constructors, which now do not descend from
// the host Function but rather from VMFunction!
let VMObject = guestFunc(function Object(val) {
    // The actual behavior of Object() is more complex ;)
    return VMObject[MachineRef].ToObject(val);
});

let VMFunction = guestFunc(function Function(args, src) {
    // Could have the engine parse and compile a new guest func...
    throw new Error('Function constructor not yet supported');
});

// Set up the circular reference between
// the constructors and protoypes.
VMFunction.prototype = VMFunctionPrototype;
VMFunctionPrototype.constructor = VMFunction;
VMObject.prototype = VMObjectPrototype;
VMObjectPrototype.constructor = VMObject;

There’s more details to work out, like filling out the VMObject and VMFunction prototypes, ensuring that created functions always have a guest prototype property, etc.

Note that implementing the engine in JS’s “strict mode” means we don’t have to worry about bridging the old-fashioned arguments and caller properties, which otherwise couldn’t be replaced by the proxy because they’re non-configurable.

My main worries with this layout are that it’ll be hard to tell host from guest objects in the debugger, since the internal constructor names are the same as the external constructor names… the [MachineRef] marker property should help though.

And secondarily, it’s easier to accidentally inject a host object into a guest object’s properties or a guest function’s arguments…

Blocking host objects

We could protect guest objects from injection of host objects using another Proxy:

function wrapObj(obj) {
    return new Proxy(obj, {
        defineProperty: function(target, key, descriptor) {
            let machine = target[MachineRef];
            if (!machine.isGuestVal(descriptor.value) ||
                !machine.isGuestVal(descriptor.get) ||
                !machine.isGuestVal(descriptor.set)
            ) {
                throw new TypeError('Cannot define property with host object as value or accessors');
            }
            return Reflect.defineProperty(target, key, descriptor);
        },
        set: function(target, key, val, receiver) {
            // invariant: key is a string or symbol
            let machine = target[MachineRef];
            if (!machine.isGuestVal(val)) {
                throw new TypeError('Cannot set property to host object');
            }
            return Reflect.set(target, key, val, receiver);
        },
        setPrototypeOf: function(target, proto) {
            let machine = target[MachineRef];
            if (!machine.isGuestVal(val)) {
                throw new TypeError('Cannot set prototype to host object');
            }
            return Reflect.setPrototypeOf(obj, proto);
        },
    };
}

This may slow down access to the object, however. Need to benchmark and test some more and decide whether it’s worth it.

For functions, can also include the `apply` and `construct` traps to check for host objects in arguments:

function guestFunc(func) {
    let obj = createObj(VMFunctionPrototype);
    return new Proxy(func, {
        //
        // ... all the same traps as wrapObj and also:
        //
        apply: function(target, thisValue, args) {
            let machine = target[MachineRef];
            if (!machine.isGuestVal(thisValue)) {
                throw new TypeError('Cannot call with host object as "this" value');
            }
            for (let arg of args) {
                if (!machine.isGuestVal(arg)) {
                    throw new TypeError('Cannot call with host object as argument');
                }
            }
            return Reflect.apply(target, thisValue, args);
        },
        construct: function(target, args, newTarget) {
            let machine = target[MachineRef];
            for (let arg of args) {
                if (!machine.isGuestVal(arg)) {
                    throw new TypeError('Cannot construct with host object as argument');
                }
            }
            if (!machine.isGuestVal(newTarget)) {
                throw new TypeError('Cannot construct with host object as new.target');
            }
            return Reflect.apply(target, args, newTarget);
        },
    });
}

Exotic objects

There are also “exotic objects”, proxies, and other funky things like Arrays that need to handle properties differently from a native object… I’m pretty sure they can all be represented using proxies.

Next steps

I need to flesh out the code a bit more using the new object model, and start on spec-compliant versions of interpreter operations to get through a few simple test functions.

Once that’s done, I’ll start pushing up the working code and keep improving it. :)

Update (benchmarks)

I did some quick benchmarks and found that, at least in Node 11, swapping out the Function prototype doesn’t appear to harm call performance while using a Proxy adds a fair amount of overhead to short calls.

$ node protobench.js 
empty in 22 ms
native in 119 ms
guest in 120 ms

$ node proxybench.js
empty in 18 ms
native in 120 ms
guest in 1075 ms

This may not be significant when functions have to go through the interpreter anyway, but I’ll consider whether the proxy is needed and weigh the options…

Update 2 (benchmarks)

Note that the above benchmarks don’t reflect another issue — de-optimization of call sites that accept user-provided callbacks, if you sometimes pass them regular functions and other times pass them re-prototyped or proxied objects, they can switch optimization modes and end up slightly slower also when passed regular functions.

If you know you’re going to pass a guest object into a separate place that may be interchangeable with a native host function, you can make a native wrapper closure around the guest call and it should avoid this.

ScriptinScript is coming

Got kinda sidetracked for the last week and ended up with a half-written JavaScript interpreter written in JavaScript, which I’m calling “ScriptinScript”. O_O

There are such things already in existence, but they all seem outdated, incomplete, unsafe, or some combination of those. I’ll keep working on this for my embeddable widgets project but have to get back to other projects for the majority of my work time for now… :)

I’ve gotten it to a stage where I understand more or less how the pieces go together, and have been documenting how the rest of it will be implemented. Most of it for now is a straightforward implementation of the language spec as native modern JS code, but I expect it can be optimized with some fancy tricks later on. I think it’s important to actually implement a real language spec rather than half-assing a custom “JS-like” language, so code behaves as you expect it to … and so we’re not stuck with some totally incompatible custom tool forever if we deploy things using it.
Will post the initial code some time in the next week or two once I’ve got it running again after some major restructuring from initial proof of concept to proper spec-based behavior.

Parallelizing PNG, part 9: writing a C API in Rust

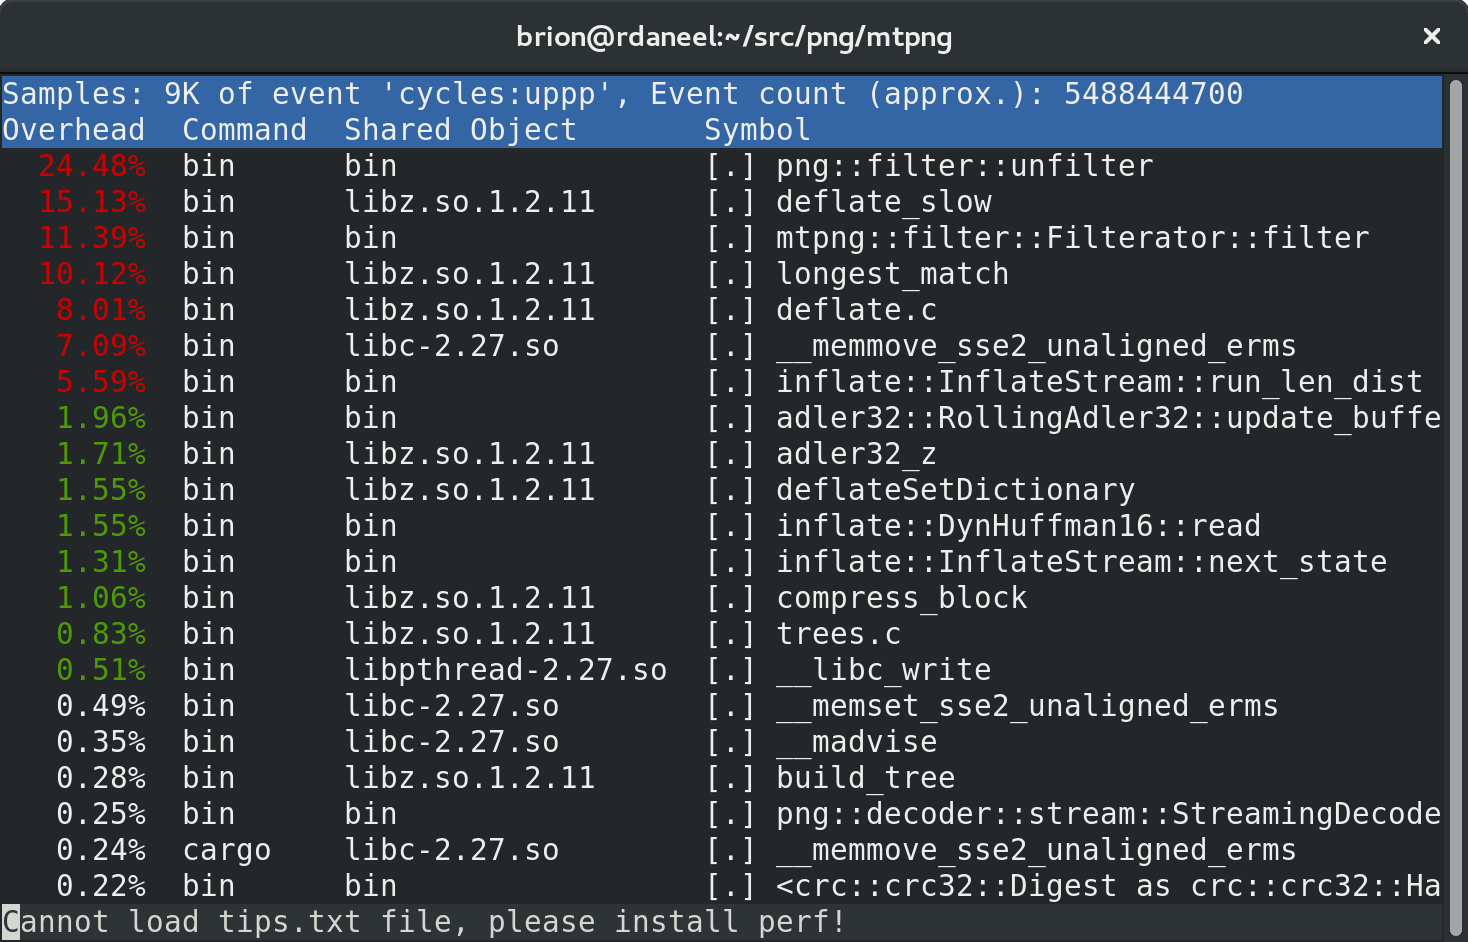
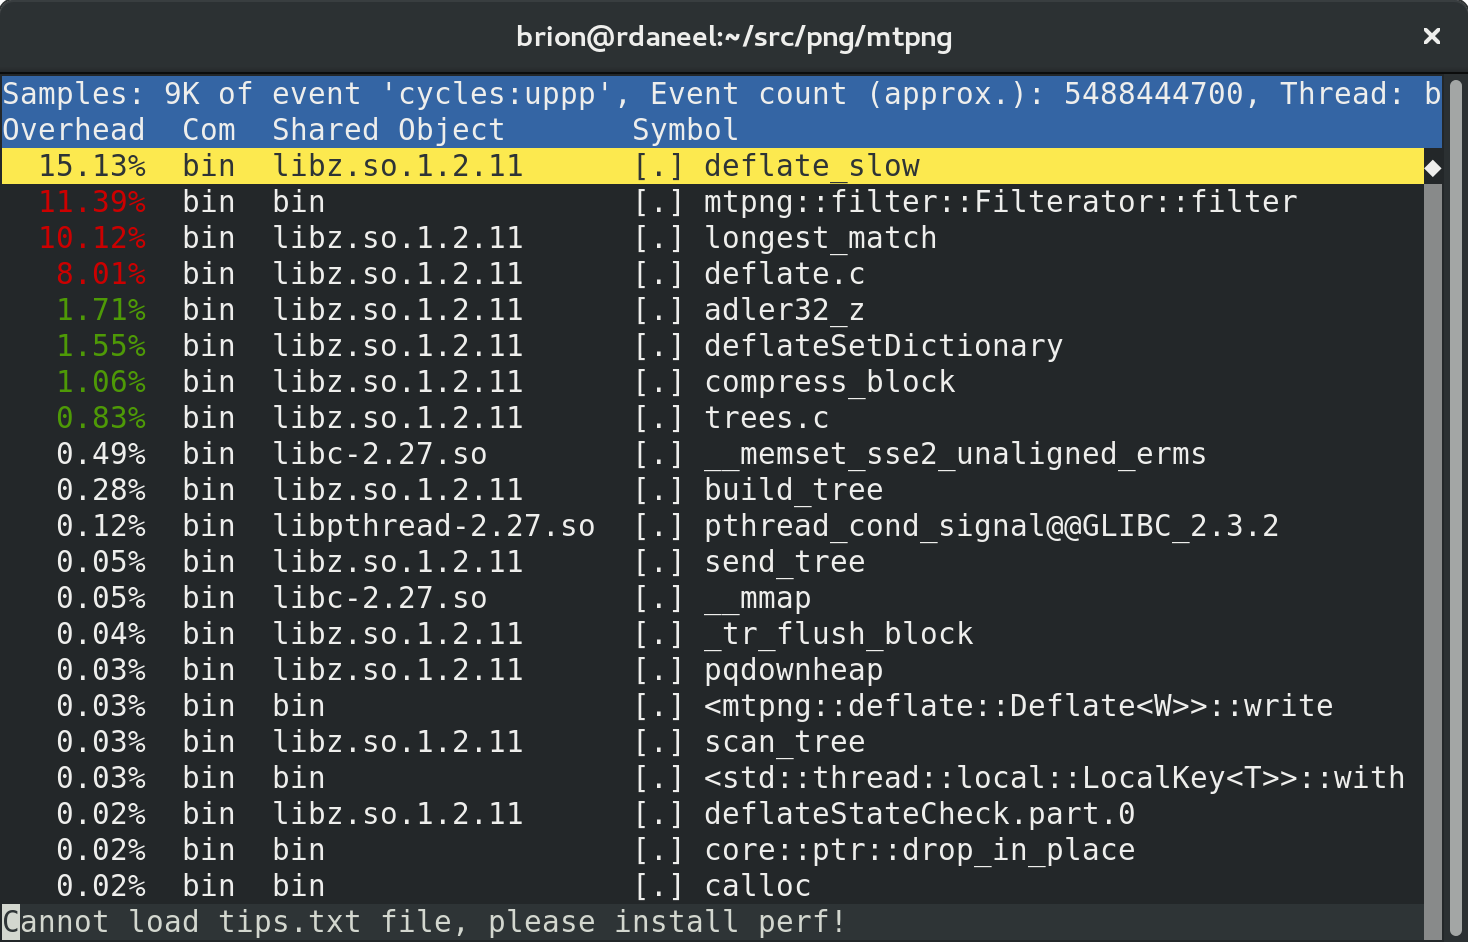
In my last posts I explored some optimization strategies inside the Rust code for mtpng, a multithreaded PNG encoder I’m creating. Now that it’s fast, and the remaining features are small enough to pick up later, let’s start working on a C API so the library can be used by C/C++-based apps.

If you search the web you’ll find a number of tutorials on the actual FFI-level interactions, so I’ll just cover a few basics and things that stood out. The real trick is in making a good build system; currently Rust’s “Cargo” doesn’t interact well with Meson, for instance, which really wants to build everything out-of-tree. I haven’t even dared touch autoconf. ;)

For now, I’m using a bare Makefile for Unix (Linux/macOS) and a batch file for Windows (ugh!) to drive the building of a C-API-exercising test program. But let’s start with the headers and FFI code!

Contracts first: make a header file

The C header file (“mtpng.h“) defines the types, constants, and functions available to users of the library. It defines the API contract, both in code and in textual comments because you can’t express things like lifetimes in C code. :)

Enums

Simple enums (“fieldless enums” as they’re called) can be mapped to C enums fairly easily, but be warned the representation may not be compatible. C enums usually (is that the spec or just usually??) map to the C ‘int’ type, which on the Rust side is known as c_int. (Clever!)

//
// Color types for mtpng_encoder_set_color().
//
typedef enum mtpng_color_t {
    MTPNG_COLOR_GREYSCALE = 0,
    MTPNG_COLOR_TRUECOLOR = 2,
    MTPNG_COLOR_INDEXED_COLOR = 3,
    MTPNG_COLOR_GREYSCALE_ALPHA = 4,
    MTPNG_COLOR_TRUECOLOR_ALPHA = 6
} mtpng_color;

So the representation is not memory-compatible with the Rust version, which explicitly specifies to fit in a byte:

#[derive(Copy, Clone)]
#[repr(u8)]
pub enum ColorType {
    Greyscale = 0,
    Truecolor = 2,
    IndexedColor = 3,
    GreyscaleAlpha = 4,
    TruecolorAlpha = 6,
}

If you really need to ship the enums around bit-identical, use #[repr(c_int)]. Note also that there’s no enforcement that enum values transferred over the FFI boundary will have valid values! So always use a checked transfer function on input like this:

impl ColorType {
    pub fn from_u8(val: u8) -> io::Result<ColorType> {
        return match val {
            0 => Ok(ColorType::Greyscale),
            2 => Ok(ColorType::Truecolor),
            3 => Ok(ColorType::IndexedColor),
            4 => Ok(ColorType::GreyscaleAlpha),
            6 => Ok(ColorType::TruecolorAlpha),
            _ => Err(other("Invalid color type value")),
        }
}

More complex enums can contain fields, and things get complex. For my case I found it simplest to map some of my mode-selection enums into a shared namespace, where the “Adaptive” value maps to something that doesn’t fit in a byte and so could not be valid, and the “Fixed” values map to their contained byte values:

#[derive(Copy, Clone)]
pub enum Mode<T> {
    Adaptive,
    Fixed(T),
}

#[repr(u8)]
#[derive(Copy, Clone)]
pub enum Filter {
    None = 0,
    Sub = 1,
    Up = 2,
    Average = 3,
    Paeth = 4,
}

maps to C:

typedef enum mtpng_filter_t {
    MTPNG_FILTER_ADAPTIVE = -1,
    MTPNG_FILTER_NONE = 0,
    MTPNG_FILTER_SUB = 1,
    MTPNG_FILTER_UP = 2,
    MTPNG_FILTER_AVERAGE = 3,
    MTPNG_FILTER_PAETH = 4
} mtpng_filter;

And the FFI wrapper function that takes it maps them to appropriate Rust values.

Callbacks and function pointers

The API for mtpng uses a few callbacks, required for handling output data and optionally as a driver for input data. In Rust, these are handled using the Write and Read traits, and the encoder functions are even generic over them to avoid having to make virtual function calls.

In C, the traditional convention is followed of passing function pointers and a void* as “user data” (which may be NULL, or a pointer to a private state structure, or whatever floats your boat).

In the C header file, the callback types are defined for reference and so they can be validated as parameters:

typedef size_t (*mtpng_read_func)(void* user_data,
                                  uint8_t* p_bytes,
								  size_t len);

typedef size_t (*mtpng_write_func)(void* user_data,
                                   const uint8_t* p_bytes,
                                   size_t len);

typedef bool (*mtpng_flush_func)(void* user_data);

On the Rust side we must define them as well:

pub type CReadFunc = unsafe extern "C"
    fn(*const c_void, *mut uint8_t, size_t) -> size_t;

pub type CWriteFunc = unsafe extern "C"
    fn(*const c_void, *const uint8_t, size_t) -> size_t;

pub type CFlushFunc = unsafe extern "C"
    fn(*const c_void) -> bool;

Note that the function types are defined as unsafe (so must be called from within an unsafe { … } block or another unsafe function), and extern “C” which defines them as using the platform C ABI. Otherwise the function defs are pretty standard, though they use C-specific types from the libc crate.

Note it’s really important to use the proper C types because different platforms may have different sizes of things. Not only do you have the 32/64-bit split, but 64-bit Windows has a different c_long type (32 bits) than 64-bit Linux or macOS (64 bits)! This way if there’s any surprises, the compiler will catch it when you build.

Let’s look at a function that takes one of those callbacks:

extern mtpng_result
mtpng_encoder_write_image(mtpng_encoder* p_encoder,
                          mtpng_read_func read_func,
						  void* user_data);
#[no_mangle]
pub unsafe extern "C"
fn mtpng_encoder_write_image(p_encoder: PEncoder,
                             read_func: Option<CReadFunc>,
                             user_data: *const c_void)
-> CResult
{
    if p_encoder.is_null() {
        CResult::Err
    } else {
        match read_func {
            Some(rf) => {
                let mut reader = CReader::new(rf, user_data);
                match (*p_encoder).write_image(&mut reader) {
                    Ok(()) => CResult::Ok,
                    Err(_) => CResult::Err,
                }
            },
            _ => {
                CResult::Err
            }
        }
    }
}

Note that in addition to the unsafe extern “C” we saw on the function pointer definitions, the exported function also needs to use #[no_mangle]. This marks it as using a C-compatible function name, otherwise the C linker won’t find it by name! (If it’s an internal function you want to pass by reference to C, but not expose as a symbol, then you don’t need that.)

Notice that we took an Option<CReadFunc> as a parameter value, not just a CReadFunc. This is needed so we can check for NULL input values, which map to None. while valid values map to Some(CReadFunc). (The actual pointer to the struct is more easily checked for NULL, since that’s inherent to pointers.)

The actual function is passed into a CReader, a struct that implements the Read trait by calling the function pointer:

pub struct CReader {
    read_func: CReadFunc,
    user_data: *const c_void,
}

impl CReader {
    fn new(read_func: CReadFunc,
           user_data: *const c_void)
    -> CReader
    {
        CReader {
            read_func: read_func,
            user_data: user_data,
        }
    }
}

impl Read for CReader {
    fn read(&mut self, buf: &mut [u8]) -> io::Result<usize> {
        let ret = unsafe {
            (self.read_func)(self.user_data,
                             &mut buf[0],
                             buf.len())
        };
        if ret == buf.len() {
            Ok(ret)
        } else {
            Err(other("mtpng read callback returned failure"))
        }
    }
}

Opaque structs

Since I’m not exposing any structs with public fields, I’ve got a couple of “opaque struct” types on the C side which are used to handle pointing at the Rust structs from C. Not a lot of fancy-pants work is needed to marshal them; the pointers on the C side pass directly to pointers on the Rust side and vice versa.

typedef struct mtpng_threadpool_struct
    mtpng_threadpool;

typedef struct mtpng_encoder_struct
    mtpng_encoder;

One downside of opaque structs on the C side is that you cannot allocate them on the stack, because the compiler doesn’t know how big they are — so we must allocate them on the heap and explicitly release them.

In Rust, it’s conventional to give structs an associated “new” method, and/or wrap them in a builder pattern to set up options. Here I wrapped Rayon’s ThreadPool builder with a single function that takes a number of threads, boxes it up on the heap, and returns a pointer to the heap object:

extern mtpng_result
mtpng_threadpool_new(mtpng_threadpool** pp_pool,
                     size_t threads);
pub type PThreadPool = *mut ThreadPool;

#[no_mangle]
pub unsafe extern "C"
fn mtpng_threadpool_new(pp_pool: *mut PThreadPool,
	                    threads: size_t)
-> CResult
{
    if pp_pool.is_null() {
        CResult::Err
    } else {
        match ThreadPoolBuilder::new().num_threads(threads).build() {
            Ok(pool) => {
                *pp_pool = Box::into_raw(Box::new(pool));
                CResult::Ok
            },
            Err(_err) => {
                CResult::Err
            }
        }
    }
}

The real magic here is Box::into_raw() which replaces the Box<ThreadPool> smart pointer with a raw pointer you can pass to C. This means there’s no longer any smart management or releasing, so it’ll outlive the function… and we need an explicit release function:

extern mtpng_result
mtpng_threadpool_release(mtpng_threadpool** pp_pool);
#[no_mangle]
pub unsafe extern "C"
fn mtpng_threadpool_release(pp_pool: *mut PThreadPool)
-> CResult
{
    if pp_pool.is_null() {
        CResult::Err
    } else {
        drop(Box::from_raw(*pp_pool));
        *pp_pool = ptr::null_mut();
        CResult::Ok
    }
}

Box::from_raw() turns the pointer back into a Box<ThreadPool>, which de-allocates the ThreadPool at the end of function scope.

Lifetimes

Annotating object lifetimes in this situation is ….. confusing? I’m not sure I did it right at all. The only lifetime marker I currently use is the for thread pool, which must live at least as long as the encoder struct.

As a horrible hack I’ve defined the CEncoder to use static lifetime for the threadpool, which seems …. horribly wrong. I probably don’t need to do it like this. (Guidance and hints welcome! I will update the post and the code! :D)

// Cheat on the lifetimes?
type CEncoder = Encoder<'static, CWriter>;

Then the encoder creation, which takes an optional ThreadPool pointer and required callback function pointers, looks like:

extern mtpng_result
mtpng_encoder_new(mtpng_encoder** pp_encoder,
                  mtpng_write_func write_func,
                  mtpng_flush_func flush_func,
                  void* const user_data,
                  mtpng_threadpool* p_pool);
pub type PEncoder = *mut CEncoder;

#[no_mangle]
pub unsafe extern "C"
fn mtpng_encoder_new(pp_encoder: *mut PEncoder,
                     write_func: Option<CWriteFunc>,
                     flush_func: Option<CFlushFunc>,
                     user_data: *const c_void,
                     p_pool: PThreadPool)
-> CResult
{
    if pp_encoder.is_null() {
        CResult::Err
    } else {
        match (write_func, flush_func) {
            (Some(wf), Some(ff)) => {
                let writer = CWriter::new(wf, ff, user_data);
                if p_pool.is_null() {
                    let encoder = Encoder::new(writer);
                    *pp_encoder = Box::into_raw(Box::new(encoder));
                    CResult::Ok
                } else {
                    let encoder = Encoder::with_thread_pool(writer, &*p_pool);
                    *pp_encoder = Box::into_raw(Box::new(encoder));
                    CResult::Ok
                }
            },
            _ => {
                CResult::Err
            }
        }
    }
}

Note how we take the p_pool pointer and turn it into a Rust reference by dereferencing the pointer (*) and then re-referencing it (&). :)

Because we’re passing the thread pool across a safe/unsafe boundary, it’s entirely the caller’s responsibility to uphold the compiler’s traditional guarantee that the pool instance outlives the encoder. There’s literally nothing to stop it from being released early by C code.

Calling from C

Pretty much all the external-facing functions return a a result status enum type, which I’ve mapped the Rust Result<_,Error(_)> system into. For now it’s just ok or error states, but will later add more detailed error codes:

Since C doesn’t have a convenient “?” syntax or try! macro for trapping those, I wrote a manual TRY macro for my samples’s main(). Ick!

#define TRY(ret) { \
    mtpng_result _ret = (ret); \
    if (_ret != MTPNG_RESULT_OK) { \
        fprintf(stderr, "Error: %d\n", (int)(_ret)); \
        retval = 1; \
        goto cleanup; \
    }\
}

The calls are then wrapped to check for errors:

int main() {

... some state setup ...

	mtpng_threadpool* pool;
    TRY(mtpng_threadpool_new(&pool, threads));

    mtpng_encoder* encoder;
    TRY(mtpng_encoder_new(&encoder,
                          write_func,
                          flush_func,
                          (void*)&state,
                          pool));

    TRY(mtpng_encoder_set_chunk_size(encoder, 200000));

    TRY(mtpng_encoder_set_size(encoder, 1024, 768));
    TRY(mtpng_encoder_set_color(encoder, color_type, depth));
    TRY(mtpng_encoder_set_filter(encoder, MTPNG_FILTER_ADAPTIVE));

    TRY(mtpng_encoder_write_header(encoder));
    TRY(mtpng_encoder_write_image(encoder, read_func, (void*)&state));
    TRY(mtpng_encoder_finish(&encoder));

cleanup:
    if (encoder) {
        TRY(mtpng_encoder_release(&encoder));
    }
    if (pool) {
        TRY(mtpng_threadpool_release(&pool));
    }

    printf("goodbye\n");
    return retval;
}

Ok, mostly straightforward right? And if you don’t like the TRY macro you can check error returns manually, or whatever. Just don’t forget to check them! :D

Error state recovery other than at API boundary checks may or may not be very good right now, I’ll clean that up later.

Now I’m pretty sure some things will still explode if I lean the wrong way on this system. For instance looking above, I’m not convinced that the pointers on the stack will be initialized to NULL except on debug builds. :D

Don’t forget the callbacks

Oh right, we needed read and write callbacks! Let’s put those back in. Start with a state structure we can use (it doesn’t have to be the same state struct for both read and write, but it is here cause why not?)

typedef struct main_state_t {
    FILE* out;
    size_t width;
    size_t bpp;
    size_t stride;
    size_t y;
} main_state;

static size_t read_func(void* user_data,
	                    uint8_t* bytes,
	                    size_t len)
{
    main_state* state = (main_state*)user_data;
    for (size_t x = 0; x < state->width; x++) {
        size_t i = x * state->bpp;
        bytes[i] = (x + state->y) % 256;
        bytes[i + 1] = (2 * x + state->y) % 256;
        bytes[i + 2] = (x + 2 * state->y) % 256;
    }
    state->y++;
    return len;
}

static size_t write_func(void* user_data,
	                     const uint8_t* bytes,
	                     size_t len)
{
    main_state* state = (main_state*)user_data;
    return fwrite(bytes, 1, len, state->out);
}

static bool flush_func(void* user_data)
{
    main_state* state = (main_state*)user_data;
    if (fflush(state->out) == 0) {
        return true;
    } else {
        return false;
    }
}

Couple of things stand out to me: first, this is a bit verbose for some common cases.

If you’re generating input row by row like in this example, or reading it from another source of data, the read callback works ok though you have to set up some state. If you already have it in a buffer, it’s a lot of extra hoops. I’ve added a convenience function for that, which I’ll describe in more detail in a later post due to some Rust-side oddities. :)

And writing to a stdio FILE* is probably really common too. So maybe I’ll set up a convenience function for that? Don’t know yet.

Building the library

Oh right! We have to build this code don’t we, or it won’t actually work.

Start with the library itself. Since we’re creating everything but the .h file in Rust-land, we can emit a shared library directly from the Cargo build system by adding a ‘cdylib’ target. In our Cargo.toml:

[lib]
crate-type = ["rlib", "cdylib"]

The “rlib” is a regular Rust library; the “cdylib” is a C-compatible shared library that exports only the C-compatible public symbols (mostly). The rest of the Rust standard library (the parts that get used) are compiled statically inside the cdylib, so they don’t interfere with other libraries that might have been built in a similar way.

Note this means that while a Rust app that uses mtpng and another rlib can share a Rayon ThreadPool instance, a C app that uses mtpng and another cdylib cannot share ThreadPools because they might be different versions etc.

Be warned that shared libraries are complex beasts, starting with the file naming! On Linux and most other Unix systems, the output file starts with “lib” and ends with “.so” (libmtpng.so). But on macOS, it ends in “.dylib” (libmtpng.dylib). And on Windows, you end up with both “mtpng.dll” which is linked at runtime and an “mtpng.dll.lib” which is linked at compile time (and really should be “mtpng.lib” to follow normal conventions on Windows, I think).

I probably should wrap the C API and the cdylib output in a feature flag, so it’s not added when building pure-Rust apps. Todo!

For now, the Makefile or batch file are invoking Cargo directly, and building in-tree. To build cleanly out of tree there are some options on Cargo to specify the target dir and (in nightly toolchain) the work output dir. This seems to be a work in progress, so I’m not worrying about the details too much yet, but if you need to get something working soon that integrates with autotools, check out GNOME’s librsvg library which has been migrating code from C to Rust over the last couple years and has some relevant build hacks. :)

Once you have the output library file(s), you put them in the appropriate place and use the appropriate system-specific magic to link to them in your C program like for any shared library.

The usual gotchas apply:

  • Unix (Linux/macOS) doesn’t like libraries that aren’t in the standard system locations. You have to add an -L param with the path to the library to your linker flags to build against the library in-tree or otherwise not standardly located.
  • Oh and Unix also hates to load libraries at runtime for the same reason! Use LD_LIBRARY_PATH or DYLD_LIBRARY_PATH when running your executable. Sigh.
  • But sometimes macOS doesn’t need that because it stores the relative path to your library into your executable at link time. I don’t even understand that Mach-O format, it’s crazy! ;)
  • Windows will just load any library out of the current directory, so putting mtpng.dll in with your executable should work. Allll right!

It should also be possible to build as a C-friendly static library, but I haven’t fiddled with that yet.

Windows fun

As an extra fun spot on Windows when using the MSVC compiler and libc… Cargo can find the host-native build tools for you, but gets really confused when you try to cross-build 32-bit on 64-bit sometimes.

And MSVC’s setup batch files are … hard to find reliably.

In the current batch file I’ve had some trouble getting the 32-bit build working, but 64-bit is ok. Yay!

Next steps

There’s a lot of little things left to do on mtpng: adding support for more chunks so it can handle indexed color images, color profiles, comments, etc… Ensuring the API is good and error handling is correct… Improving that build system. :)

And I think I can parallelize filtering and deflate better within a chunk, making compression faster for files too small for a single block. The same technique should work in reverse for decoding too.

Well, it’s been a fun project and I really think this is going to be useful as well as a great learning experience. :) Expect a couple more update posts in this series in the next couple weeks on those tuning issues, and fun little things I learn about Rust along the way!

Parallelizing PNG, part 8: Rust macros for constant specialization

In my last posts I covered profiling and some tips for optimizing inner loops in Rust code while working on a multithreaded PNG encoder. Rust’s macro system is another powerful tool for simplifying your code, and sometimes awesomeizing your performance…

Rust has a nice system of generics, where types and functions can be specialized based on type and lifetime parameters. For instance, a Vec<u8> and a Vec<u32> both use the same source code describing the Vec structure and all its functions, but at compile time any actual Vec<T> variants get compiled separately, with as efficient a codebase as possible. So this gives a lot of specialization-based performance already, and should be your first course of action for most things.

Unfortunately you can’t vary generics over constant values, like integers, which turns out to sometimes be something you really wish you could have!

In mtpng, the PNG image filtering code needs to iterate through rows of bytes and refer back to bytes from a previous pixel. This requires an offset that’s based on the color type and bit depth. From our last refactoring of the main inner loop it looked like this, using Rust’s iterator system:

let len = out.len();
for (dest, cur, left, up, above_left) in
    izip!(&mut out[bpp ..],
          &src[bpp ..],
          &src[0 .. len - bpp],
          &prev[bpp ..],
          &prev[0 .. len - bpp]) {
    *dest = func(*cur, *left, *up, *above_left);
}

When bpp is a variable argument to the function containing this loop, everything works fine — but total runtime is a smidge lower if I replace it with a constant value.

Nota bene: In fact, I found that the improvements from this macro hack got smaller and smaller as I made other optimizations, to the point that it’s now saving only a single instruction per loop iteration. :) But for times when it makes a bigger difference, keep reading! Always profile your code to find out what’s actually slower or faster!

Specializing macros

The filter functions look something like this, without the specialization goodies I added:

fn filter_paeth(bpp: usize, prev: &[u8], src: &[u8], dest: &mut [u8]) {
    dest[0] = Filter::Paeth as u8;

    filter_iter(bpp, &prev, &src, &mut dest[1 ..],
	            |val, left, above, upper_left| -> u8
	{
        val.wrapping_sub(paeth_predictor(left, above, upper_left))
    })
}

The filter_iter function is the wrapper func from previous post; it runs the inner loop and calls the closure with the actual filter (inlining the function call out to make it zippy in release builds). Rust + LLVM do a great job of optimizing things up already, and this is quite fast — especially since moving to iterators.

But if we need to specialize on something we can’t express as a type constraint on the function definition… macros are your friend!

The macro-using version of the function looks very similar, with one addition:

fn filter_paeth(bpp: usize, prev: &[u8], src: &[u8], dest: &mut [u8]) {
    filter_specialize!(bpp, |bpp| {
        dest[0] = Filter::Paeth as u8;

        filter_iter(bpp, &prev, &src, &mut dest[1 ..],
                    |val, left, above, upper_left| -> u8
		{
            val.wrapping_sub(paeth_predictor(left, above, upper_left))
        })
    })
}

The “!” on “filter_specialize!” indicates it’s a macro, not a regular function, and makes for a lot of fun! commentary! about! how! excited! Rust! is! like! Captain! Kirk! ;)

Rust macros can be very powerful, from simple token replacement up to and including code plugins to implement domain-specific languages… we’re doing something pretty simple, accepting a couple expressions and wrapping them up differently:

macro_rules! filter_specialize {
    ( $bpp:expr, $filter_closure:expr ) => {
        {
            match $bpp {
                // indexed, greyscale@8
                1 => $filter_closure(1),
                // greyscale@16, greyscale+alpha@8 
                2 => $filter_closure(2),
                // truecolor@8
                3 => $filter_closure(3),
                // truecolor@8, greyscale+alpha@16
                4 => $filter_closure(4),
                // truecolor@16
                6 => $filter_closure(6),
                // truecolor+alpha@16
                8 => $filter_closure(8),
                _ => panic!("Invalid bpp, should never happen."),
            }
        }
    }
}

The “macro_rules!” bit defines the macro using the standard magic, which lets you specify some token types to match and then a replacement token stream.

Here both $bpp and $filter_closure params are expressions — you can also take identifiers or various other token types, but here it’s easy enough.

Note that unlike C macros, you don’t have to put a “\” at the end of every line, or carefully put parentheses around your parameters so they don’t explode. Neat!

However you should be careful about repeating things. Here we could save $filter_closure in a variable and use it multiple times, but since we’re specializing inline versions of it that’s probably ok.

Note that things like match, if, and function calls can all inline constants at compile time! This means each invocation uses the exact-bpp inlined variant of the function.

Down on the assembly line

Looking at the “Paeth” image filter, which takes three byte inputs from different pixels… here’s a fragment from the top of the inner loop where it reads those pixel byte values:

movdqu (%rcx,%r9,1),%xmm1     ; read *left
movdqu (%rsi,%rbx,1),$xmm3    ; read *up
movdqu (%rsi,%r9,1),%xmm5     ; read *above_left

(Note we got our loop unrolled and vectorized by Rust’s underlying LLVM optimizer “for free” so it’s loading and operating on 16 bytes at a time here.)

Here, %rcx points to the current row and %rsi to the previous row. %rbx contains the loop iterator index, and %r9 has a copy of the index offset by -bpp (in this case -4, but the compiler doesn’t know that) to point to the previous pixel.

The version with a constant bytes-per-channel is able to use the fixed offset directly in x86’s addressing scheme:

movdqu (%rcx,%rbx,1),%xmm1    ; read *left
movdqu (%rsi,%rbx,1),%xmm5    ; read *above_left
movdqu 0x4(%rsi,%rbx,1),%xmm3 ; read *up

Here, %rbx has the previous-pixel index, and there’s no need to maintain the second indexer.

That doesn’t seem like an improvement there — it’s the same number of instructions and as far as I know it’s “free” to use a constant offset in terms of instructions per cycle. But it is faster. Why?

Well, let’s go to the end of the loop! The variable version has to increment both indexes:

add $0x10,%r9   ; %r9 += 16
add $0x10,%rbx  ; %rbx += 16
cmp %r9,%r14    ; if %r9 > len - (len % 16)
jne f30         ; then continue loop

but our constant version only has to update one.

add $0x10,%rbx ; %rbx += 16
cmp %rbx,%r8   ; if %rbx > len - (len % 16)
jne 2092       ; then continue loop

Saved one instruction in an inner loop. It’s one of the cheapest instructions you can do (adding to a register is a single cycle, IIRC), so it doesn’t save much. But it adds up on very large files to …. a few ms here and there.

The improvement was bigger earlier in the code evolution, when I was using manual indexing into the slices. :)

Macro conclusions

  • Always profile to see what’s slow, and always profile to see if your changes make a difference.
  • Use generics to vary functions and types when possible.
  • Consider macros to specialize code in ways you can’t express in the generics system, but check that the compiled output does and performs how you want!

I may end up removing the filter specialization macro since it’s such a small improvement now and it costs in code size. :) But it’s a good trick to know for when it’s helpful!

Next: interfacing Rust code with C!


Parallelizing PNG, part 7: Rust profiling on Linux

I already covered some inner-loop optimization tricks for low-level Rust code in mtpng, but how do you check how fast bits of your code are anyway?

It’s fairly easy to wrap your whole code in a timer, which I’ve done for convenience of testing total runtime:

extern crate time;
use time::precise_time_s;

...

let start_time = precise_time_s();
write_png(&outfile, header, options, &pool, &data)?;
let delta = precise_time_s() - start_time;

println!("Done in {} ms", (delta * 1000.0).round());

(High-level benchmarks like this are supported in nightly/unstable Rust via “cargo bench”, or in stable with some additional tools.)

It’s a pain in the butt to do that kind of testing on all your inner functions though, and taking the timings affects your performance so you really shouldn’t try!

The way to go is to use a sampling-based profiler native to your operating system. I’ve done most of my detailed profiling on Linux, using the “perf” tool.

Build preparation

Currently the “cargo” package manager doesn’t support a profiling-specific … profile … for building. You need debug symbols or you won’t understand much of your profile details, but you need a fully optimized build or why bother measuring its performance?

It’s fairly easy to add debug info to your release builds in your Cargo.toml file:

[profile.release]
# Unoptimized debug builds are too slow to profile
# having debug info doesn't hurt perf for now
debug = true

Though you might want to remove it before making binary releases. :)

Alternatively you could remove all the things that slow down performance from the debug profile and add optimization to it.

Perf is good

Perf seems to have come from Linux kernel-land, and has all kinds of magical abilities of system-wide profiling I haven’t even fathomed yet. But it’s fairly easy to use for quick and dirty profiling!

Run your program with “perf record” plus your command line; I usually go ahead and run via “cargo run” and then skip through the cargo invocation so I don’t have to go finding the binary under targets/release/bin or whereever.

$ perf record cargo run --release -- in.png out.png --threads=1

(Using a single worker thread makes it easier to read the profile, though sometimes you want to go crazy and test with all threads. Perf will happily record all the threads and child processes!)

If you have a long-running process you want to attach to at runtime, you can do that with the -p option and the pid:

$ perf record -p 12345

This causes a very slight slowdown to your program as it records, but it’s consistent over time and can measure hotspots down to the instructions!

Reporting for duty

Once you’ve run the program, pull up an interactive report in your terminal with “perf report”:

$ perf report

You can also save multiple recordings and pick up a past one, if you want to compare multiple runs of versions of your program.

The initial view will be of the entire run: all processes, all threads, every symbol in it. (You won’t see symbols for system libraries unless you’ve installed debug info packages.)

That “Cannot load tips.txt file” seems to be a packaging problem with perf in Fedora. :) It’s harmless.

Use the arrow keys to pick an item of interest — in this case mtpng::filter::Filterator::filter — and hit enter to get a menu:

“bin” is the name of my binary (clever), so let’s first dive into the relevant worker thread from my process, and ignore the rest:

Now we can see that the biggest individual time cost in the worker thread pool is libz’s “deflate” compression! This is only because we’re seeing the profile after a few days of optimization. Before, the biggest was the filter call. :D

Let’s scroll down and hit enter to look at the filter function in detail:

Hit “Annotate” and the real fun starts:

It’ll pop you into what it thinks is the biggest hotspot, but in a big function you might have to scroll around to find the relevant stuff.

You’ll notice both the instruction-by-instruction disassembly gibberish (useful but tricky to understand!) and little bits of your original source and (mangled) symbol declarations.

In heavily optimized Rust code it can be hard to follow exactly what’s going on because things get re-ordered and there can be magic under the hood you didn’t realize were happening… but it can be enough to piece together which individual parts of your function are slow, and to see which bits are different when you change something.

In this case we can see that the filter complexity heuristic loop has been auto-vectorized to use SSE instructions, even though my source code is a regular call in an iterator loop. Pretty rad!

Next post: using Rust macros to specialize functions for fun and performance!

Parallelizing PNG, part 6: Rust slices and loop optimization

Looking at interesting patterns and bottlenecks I discover working on a multithreaded PNG encoder in Rust

A common pattern in low-level code is passing around references to data buffers that are owned somewhere higher up the call chain. In C you either send a pointer and a length as a pair of parameters, or you send a pointer and have a convention like NULL-termination, and then you carefully read and write only within that region…

Take a slice

In Rust, you use a data type called a “slice”, which is as pointer+length pair but with safer semantics and some really nice syntactic sugar. :) A slice can be … sliced … out of any contiguous structure like a fixed-size array, a resizable vector, or another slice.

There’s two big safety improvements over C pointers:

  • Rust’s compile-time borrow checker system ensures that only one piece of code holds a mutable reference to the underlying data, so you can’t have an invalid reference. (Imagine having a slice into a vector, and then the vector resizes due to an append! Can’t happen.)
  • Access via index (my_slice[i]) is bounds-checked at runtime. Like dereferencing a null pointer in C, it will probably* kill your process to access a slice out of bounds.

[Update: *Dereferencing null in C is “undefined behavior” and sometimes doesn’t crash, depending on the system and whether you’ve installed signal handlers. Rust’s “panics” are more defined in how they behave, and can in some cases be caught and recovered from. But by default, either is bad for you if you don’t handle it! ;)]

“But wait!” I hear you say. “Bounds checks at runtime are sslloowww!” Well there’s ways around that. :)

Bounds checkin’

So what is indexing into an array anyway? The index value is a “usize” (unsigned integer, pointer-sized) which is behind the scenes added to the underlying pointer to produce a final pointer. So we can think of my_slice[i] = x as doing something like this behind the scenes:

*(my_slice.as_ptr() + i) = x;

With the bounds check, it looks something like:

if i < my_slice.len() {
    *(my_slice.as_ptr() + i) = x;
} else {
    panic!("Out of bounds");
}

Note that you don’t need to check for i >= 0 because it’s an unsigned type!

But what about in a loop? Won’t that check slow tight loops down?

for i in 0 .. my_slice.len() {
    if i < my_slice.len() {
        *(my_slice.as_ptr() + i) = x;
    } else {
        panic!("Out of bounds");
    }
}

That looked kind of redundant right? Isn’t the loop already checking that i < my_slice.len() on every iteration? In fact it is… And in an optimized build, the bounds check can actually be removed by the optimizer!

Don’t be afraid to let the optimizer do your work for you — the default-immutability and ownership semantics of Rust mean there’s a lot of things like that that improve dramatically in an optimized build while still retaining code that’s both straightforward to read and refactor, and performs well.

Iterators

Using a for loop with an index range isn’t always considered good style in Rust, both because of those bounds checks and because iterators are far, far more flexible since they can work with other data structures than slices.

An iterator version of that little loop would start out as:

for iter in my_slice.iter_mut() {
  *iter = x;
}

You call iter_mut() to get a mutable reference, or iter() for immutable. Each pass through the loop gives you a reference to the element which you can read or write appropriately.

For a slice that essentially compiles down to the same as the for loop with an index range, but without needing the intermediate check even in unoptimized builds.

Cheating

You can also use the “unsafe” get_unchecked and get_unchecked_mut functions to get a reference to an indexed value without the bounds check! But you have to wrap in an “unsafe” block, because Rust makes you label stuff like that. :D

for i in 0 .. my_slice.len() {
    unsafe {
        *(my_slice.get_unchecked_mut(i)) = x;
    }
}

Multiple slices and the optimizer

In mtpng I found a case where I had to use indexing instead of iterators because I was working with multiple slices in sync, which introduced several bounds checks.

I found that adding validation checks that the lengths were all the same actually made all the bounds checks disappear, doubling the speed of the tight loop and improving overall encode speed by over 25%.

Without the validation, the function looked something like this:

fn filter_iter<F>(bpp: usize, prev: &[u8], src: &[u8], out: &mut [u8], func: F)
    where F : Fn(u8, u8, u8, u8) -> u8
{
    for i in 0 .. bpp {
        let zero = 0u8;
        out[i] = func(src[i], zero, prev[i], zero);
    }
    for i in bpp .. out.len() {
        out[i] = func(src[i], src[i - bpp], prev[i], prev[i - bpp]);
    }
}

With the checks added at the top, before the inner loop:

fn filter_iter<F>(bpp: usize, prev: &[u8], src: &[u8], out: &mut [u8], func: F)
    where F : Fn(u8, u8, u8, u8) -> u8
{
    assert!(out.len() >= bpp);
    assert!(prev.len() == out.len());
    assert!(src.len() == out.len());

    for i in 0 .. bpp {
        let zero = 0u8;
        out[i] = func(src[i], zero, prev[i], zero);
    }
    for i in bpp .. out.len() {
        out[i] = func(src[i], src[i - bpp], prev[i], prev[i - bpp]);
    }
}

At runtime those extra checks at the top should never trigger, because all three slices are the same length and bpp is never larger than the length. But the optimizer didn’t know that! Making the invariant explicit in the code, instead of just hoping it was right, lets the optimizer turn all of these:

[Updated: using the assert! macro is better style than manually calling panic! in your high-level code. Note that assert! code is always present in both debug and release builds; use the debug_assert! macro for checks that aren’t necessary for safety or performance.]

for in in bpp .. out.len() {
    if i < src.len() {
        if i < prev.len() {
            if i < out.len() {
                out[i] = func(src[i], src[i - bpp], prev[i], prev[i - bpp]);
            } else {
                panic!("Out of bounds");
            }
        } else {
            panic!("Out of bounds");
        }
    } else {
        panic!("Out of bounds");
    }
}

Into this with no bounds checks:

for in in bpp .. out.len() {
    out[i] = func(src[i], src[i - bpp], prev[i], prev[i - bpp]);
}

Pretty neat right!

zip and izip!

Update: The above case can also be rewritten with iterators by “zipping” multiple iterators together.

If you only have two iterators, you can use the “zip” function in the standard library; if you have more you can use the “izip!” macro in the itertools crate.

This ends up with code that can be a bit verbose but should also run cleanly:

let len = out.len();
for (dest, cur, left, up, above_left) in
    izip!(&mut out[bpp ..],
          &src[bpp ..],
          &src[0 .. len - bpp],
          &prev[bpp ..],
          &prev[0 .. len - bpp]) {
    *dest = func(*cur, *left, *up, *above_left);
}

[Update: I was able to confirm that careful use of izip! slightly outperforms indexing plus voodoo assertions, removing another instruction or two per inner loop iteration. If you can write sanely that way, it works nicely! Won’t work if you need random access to the various slices, but for this kind of lock-step iteration it’s perfect.]

Debug vs release builds

The rust compiler and the cargo package manager default to unoptimized debug builds if you don’t tell it to make a release build.

This sounds good, except the entire Rust standard library is built on the same patterns of using safe clean code that optimizes well… For mtpng I’m seeing a 50x slowdown in runtime in unoptimized debug builds versus optimized release builds. Yeeeooooowwwwch!

Note that you can change the optimization level for your own debug builds in the Cargo.toml file in your project, which can help; you can crank it all the way up to a release build’s optimization status or leave it somewhere in the middle.

Parallelizing PNG, part 5: choosing Rust for mtpng

In my last post I wrapped up the patches to improve perceived performance of screenshots on the Linux GNOME desktop. With that done, why not implement my crazy plan for parallel PNG encoding to speed the actual save time?

Before starting any coding project, you need to choose a language to implement it in. This is driven by a number of considerations: familiarity, performance, breadth and depth of the standard library, and whether it’ll fit in with whatever eventual deployment target you have in mind.

Now C here

I’ve done a fair amount of coding in C, it’s well known for performing well, and it’s the default for most of the components in GNOME, so that’s a plus… but its standard library is small, its type and macro systems are limited so repetitious code is common, and memory management is notoriously unreliable — especially in multithreaded situations. I would either have to implement some threading details myself, or find a library to use… which might introduce a dependency to the GNOME platform.

There’s also C++, C’s weird cousin. Templates are way more powerful than C macros, but I have trouble wrapping my head around the details, and error messages expose a lot of details. Memory management and, in latest versions threading, are a big improvement! But it adds the C++ standard library as a dependency, which might or might not fly for GNOME.

My usual go-to languages are PHP and JavaScript, neither of which are suitable for a high-performance binary-parsing system component. :)

Getting Rust-y

But what about Rust? It’s being used by some other GNOME components such as librsvg which renders SVG icons (and is also used by us at Wikimedia for rendering thumbnails of SVG icons, diagrams, and maps!), and can be integrated into a C-compatible library without introducing runtime or install-time dependencies.

Rust’s type system is powerful, with a generics system that’s in some ways more limited than C++ templates but much easier to grok. And it also has a macro system that can rewrite bits of code for you in a way that, again, I find a lot easier to comprehend than C++ templates and is much more powerful than C macros.

And the memory management is much cleaner, with a lot of compile-time checking through a “borrow checker” system that can identify a HUGE number of memory-misuse problems long before you get into the debugger.

Plus, Rust’s community seems friendly, and they’ve got a good package manager system that makes it easy to pull in compile-time dependencies to fill in gaps in the standard library.

I’ve been keeping an eye on Rust for a couple years, reading a lot of docs and some books, and half-starting a few tiny test projects, but never had a project in front of me that seemed as good a time to start as this!

Well that’s just crate

Packages in Rust are called “crates”, and the package manager is named “cargo”. A crate can contain a library, a binary, or both, and can have tests, docs, examples, and even benchmarks that can be run by the package manager.

Creating a stub library crate via ‘cargo init –lib’ is fairly straightforward, and I was able to immediately have something I could compile and have tests run on with ‘cargo test’!

As an editor I’m using Visual Studio Code, which has an “rls” package which provides Rust support including inline display of compiler warnings and errors. This is a *huge* improvement versus manually switching to a terminal to run compiles to check for errors, especially as cascading errors can scroll the initial cause of your error off the screen. ;) But the error messages themselves are usually clear and helpful, often suggesting a fix for common problems.

I’m also able to run my tests on Linux, macOS, and Windows machines without any additional work, as Rust and cargo are pretty portable.

From there, I was able to start adding tiny parts of my plan, bit by bit, with confidence.

Atypical types

Rust’s type system has a number of quirks and interesting points, but the most important kinds of things are structs and enums.

Structs are like structs or classes in C++, kinda sorta. Their fields can be exposed publicly or private to the module, and they can have methods (more or less). Here’s one from the project so far:

#[derive(Copy, Clone)]
pub struct Options {
    pub chunk_size: usize,
    pub compression_level: CompressionLevel,
    pub strategy: Strategy,
    pub streaming: bool,
    pub filter_mode: FilterMode,
}

The “derive(Copy, Clone)” bit tells the compiler to treat the struct as something that can be trivially copied, like a primitive value. Not always what you want for a struct; I may remove this in my final API. The fields are also exposed directly with “pub”, which I may change to a builder pattern and accessors. But it’s an easy way to get started!

An associated “impl” block adds your associated functions and methods. The compiler checks that you initialized all fields; it’s impossible to end up with uninitialized memory by accident.

impl Options {
    // Use default options
    pub fn new() -> Options {
        Options {
            chunk_size: 128 * 1024,
            compression_level: CompressionLevel::Default,
            strategy: Strategy::Default,
            filter_mode: FilterMode::Adaptive,
            streaming: true,
        }
    }
}

Meanwhile, Rust enums can be made to work like a C enum, which is mostly a list of constant values, but they can also be a very powerful construct!

Here’s a boring enum example which maps names for the PNG byte filters to their codes:

#[derive(Copy, Clone)]
pub enum FilterType {
    None = 0,
    Sub = 1,
    Up = 2,
    Average = 3,
    Paeth = 4,
}

And here’s one that’s more interesting:

#[derive(Copy, Clone)]
pub enum FilterMode {
    Adaptive,
    Fixed(FilterType),
}

This means a FilterMode can be either the value “Adaptive” or the value “Fixed”… with an associated sub-value of type FilterType. These are kind of like C unions, but they’re not awful. ;)

That fancy enum pattern is used everywhere in Rust, with the Option<T> enum (either None or Some(T)) and Result<T, E> (either Ok(T) or Err(E)). In combination with the “match” construct this makes for great parsing of command line options into optional settings…

options.filter_mode = match matches.value_of("filter") {
    None             => FilterMode::Adaptive,
    Some("adaptive") => FilterMode::Adaptive,
    Some("none")     => FilterMode::Fixed(FilterType::None),
    Some("up")       => FilterMode::Fixed(FilterType::Up),
    Some("sub")      => FilterMode::Fixed(FilterType::Sub),
    Some("average")  => FilterMode::Fixed(FilterType::Average),
    Some("paeth")    => FilterMode::Fixed(FilterType::Paeth),
    _                => return Err(err("Unsupported filter type")),
};

There’s a little redundancy of namespaces that I can clean up with better naming there, but you get the idea. Note you can even match on an enum containing a string!

Threading with Rayon

Another big concern of mine was being able to do threading management easily. Rust’s standard library includes tools to launch threads and safely send ownership of data between them, but it’s a little bare bones for running a threadpool with a queue of work items.

The Rayon library was highly recommended; it includes both a really solid ThreadPool class that you can drop function closures into, and higher-level constructions building on top of iterators to, for instance, split a large arra-based process into small chunks.

I ended up not using the fancy iterator systems (yet?) but the ThreadPool is perfect. Combined that with message passing from the standard library to send completed blocks back to the main thread for processing, and I was able to get a working multithreaded app going in about two days, with my bugs almost entirely about my filtering, compression, and output file structure, and not the threading. :)

Deflation for once

The last main library component I needed was the actual data compression — I can implement image filtering and chunk output myself, and it was easy to grab a crc32 library via a crate. But the ‘deflate’ compression algo looks hard, and why reimplement that if I don’t have to?

There are several ‘deflate’ and ‘gzip’ implementations written in Rust available as crates, but none of them included all the abilities I needed for parallel chunked compression:

  • overriding the sliding-window dictionary with the previous chunk’s last 32 KiB of uncompressed data to improve compression across chunks
  • flushing output at the end of each chunk without marking the last block as end-of-stream

Possibly I’ll find some time later to figure out how to add those features. But for now, I used the C zlib library (the same one used by the C libpng library!) through an API adapter crate that exposes the absolute minimum C API of zlib as Rust functions and types.

It shouldn’t introduce dependencies since zlib is already used by …. lots of stuff. :D

So how’s it working out?

Pretty well. Check out my mtpng project over on github if you like!

I got it mostly working for truecolor images in about 3 days, and did some performance tuning later in the week that sped it up enough it’s often beating libpng on a single thread, and always beats it using multiple threads on large files.

The API needs work before I publish it as a crate, so I’ll keep fiddling with it, and I haven’t yet figured out how to implement the C API but I know it can be done. I’ve also got a long list of todos… :)

I’ll add more blog posts soon on some interesting details…

Om nom NUMA

While tuning BIOS settings on my old workstation PC with two CPU sockets, I noticed a setting I hadn’t touched in a long time if ever — the “memory interleaving mode” could be tuned for either SMP or NUMA, and was set on SMP.

What… what does that mean? SMP is Symmetric Multi-Processing and I’ve heard that term since ages past in Linux-land for handling multiple CPUs and cores. NUMA is just some server thing right?

So… NUMA is Non-Uniform Memory Access, and here specifically refers to the fact that each CPU socket has its own connection to its share of system memory that’s slightly faster than accessing the same memory through the other CPU socket.

With the BIOS’s memory interleave mode set to NUMA, that speed differential is exposed to the operating system, and memory from each processor is assigned to a separate region of physical memory addressing. This means the OS can assign memory and processor time to any given process optimized for speed as much as possible, only slowing down if a given process runs out of stuff fitting on one socket. Cool right?

Meanwhile with it set to SMP, the memory is laid out interleaved, so any given piece of memory might be fast, or it might be slow. Lame right?

So.

I tried it for fun, on Linux and Windows both and at first didn’t see much difference. Using valgrind’s “cachegrind” tool confirmed that the things I was testing (PHP in a tight interpreter loop, or PNG compression) were mostly working in-cache and so memory latency wasn’t a big deal, and memory bandwidth is nooooowhere near being saturated.

Then I found a case where NUMA mode fell down badly: multithreaded app with more threads than physical CPU cores on a single socket.

Running my PNG compression tests at 1, 2, 4, or 16 threads ran about as fast with SMP or NUMA mode. But at 8, there was a big dip in speed.

Since I have 2x quad-core processors with hyper-threading, the layout is:

  • 2 sockets
    • 4 cores per socket
      • 2 threads per core

SMP mode assigns threads to logical processors like this:

  • 1 thread – runs on either socket
  • 2 threads – one on each socket
  • 4 threads – two on each socket, on separate cores
  • 8 threads – four on each socket, on separate cores
  • 16 threads – eight on each socket, packing all cores’ threads

NUMA mode prefers to group them together, because they’re all in a single process:

  • 1 thread – runs on either socket
  • 2 threads – two on one socket, on separate cores
  • 4 threads – four on one socket, on separate cores
  • 8 threads – eight on one socket, packing all cores’ threads
  • 16 threads – eight on each socket, packing all cores’ threads

Now we see the problem! Because Hyper-Threading shares execution resources between the two threads of each core, you don’t get as much work done when both threads are packed.

If I hadn’t had Hyper-Threading on, 8 threads would’ve scaled better but it wouldn’t be able to run 16 (at a sllliiiggghhhtt speed boost) anymore.

Putting it back on SMP mode for now. For a system that’s always under full load NUMA is theoretically superior, but it interacts with Hyper-Threading weirdly for my up-and-down desktop/workstation workload.